Instructions for building a 17.5 deep x 22 wide x 24 tall wire cage in a plastic tray. Top-opening door, two shelves and two ramps. Lightweight. Easy to clean (a little bulky). Can reach all corners of the cage from the door. Just barely fits into the back seat of a four door sedan. Can easily be expanded. I've expanded it with a 10 foot gutter running along the back of the couch. a climbing tower, and a secondary cage on top of a bookshelf, all connteded with ramps. Cost of materials: about $50.
|
|
|
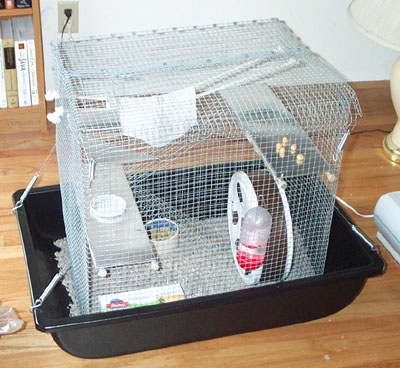
Photograph of the finished rat cage. |
Materials
- 10 feet of 1/2 x 1/2 inch hardware cloth (usually about $1.10 per foot): $11.
- 1 large black plastic mixing cement tray (6 inches deep): $9.
- 1 roll 6 inch x 10 feet aluminum flashing (thin aluminum sheet metal): $3
- 2 1/2 inch x 3 foot wooden dowels, each cut exactly in half: $2
- 4 small springs to attach cage to tray (C-139 is a good size) (4 x $2): $8
- 2 small springs to attach door (one size looser than than C-139): $4
- 6 1 inch S-hooks: $1
- 1 roll 16 gage wire: $3
TOTAL: $41 (plus tax)
Tools
- 1 pair sturdy wire cutters to cut hardware cloth
- 1 pair snub-nosed wire cutters to trim sharp edges
- 1 pair pliers to bend wire
- 1 pair needle nosed pliers to bend sharp wire ends (optional)
- 1 pair kitchen scissors to cut aluminum siding
- 1 pair Have-a-Heart cage clamp pliers
- 1 bag Have-a-Heart cage clamps
Building the cage
1) Measure the bottom of the tray very carefully to determine the inside perimeter. Round down to the nearest half inch. You want the cage to be as big as possible, but the entire bottom edge of the cage must rest on the tray or a rat may be able to squeeze out.
2) If you use the cement tray, the bottom perimeter should be 17.5 x 22 inches, or 79 inches total. Add 1 inch extra.
3) Cut the hardware cloth at 80 inches.
4) Fold the hardware cloth into a rectangular shape: first fold at 17.5 inches, second after an additional 22 inches, third fold after an additional 17.5 inches.
5) You will have an extra inch of hardware cloth, fold this back (along the outside of the cage) to give the hardware cloth some stiffness. Hardware cloth tends to be a little floppy, but if you fold it if becomes much more sturdy.
6) Using the Have-a-Heart pliers and clips, attach the two edges together with a little clip every three inches or so.
7) To give the cage even more structural integrity, pick which side you want to be the bottom of the cage, and fold up an inch of hardware cloth along the bottom (make a cut at each corner of the cage first).
Attaching cage to tray
The idea here is to have a sturdy spring and hook at each corner of the cage. The cement tray has a sturdy lip that that you can attach the hooks to.
1) Take out your four C-139 springs. Place one S-hook into one end of each spring. Close the S-hook with pliers so it is permanently attached to the spring. You now have a spring + hook combo.
2) Cut four lengths of wire and attach one piece of wire to the other end of each spring. You now have a wire + spring + hook combo.
3) Attach each of the four wire/spring/hook combos to each of the four corners of the cage. Measure and experiment with each placement so that you can place the hook over the lip of the tray and it holds the cage sturdily, but does not take so much force to hook and unhook that you can hardly do it.
4) An added benefit of the springs and hooks is that they will pull your cage into a nice rectangular shape. It may have looked wobbly before, but with the springs it will shape up nicely.
Cage top
About half of the cage top will be a roof accross the back half of the cage, and the other half will be a door. The roof is a piece of rectangular hardware cloth that is permanently attached to the cage body on three sides. The other side "floats" over the middle of the cage. The door will hinge on the floating side.
1) To make the roof, cut a piece of hardware cloth from the scrap that is 9.5 x 24. Fold an inch of both short edges and one long edge down at a 90 degree angle.
2) The roof should fit snugly on top of the cage, with the three bent edges hanging around the outside of the top of the cage like a tablecloth. The unbent, floating edge spans the middle of the cage.
3) Fasten the roof to the Cage body with Have-a-Heart clamps.
Door
The door is another rectangular piece of hardware cloth that hinges on the roof.
1) Cut a 12 x 24 piece of hardware cloth.
2) As with the roof, fold down three edges: both short edges and one of the long ones. These edges serve a dual purpose: they keep the door stiff instead of floppy, and they serve to block any gap between the door and the top of the cage.
3) The door should fit more or less snugly on the cage top, the three bent edges on the outside, the unbent edge resting on the roof.
4) Make a hinge by attaching the back end of the door to the roof with cage clamps. I attached mine not to the very edge of the roof, but one inch further back.
5) To fasten the door, make two hook-spring combos out of the two remaining springs, and attach them to each corner of the door, such that the hooks dangle down. You can now fasten the hooks to the body of the cage to keep the door closed.
Shelves
The shelves are made out of strips of aluminum flashing, which are placed on two parallel dowels. The shelf is not attached to the dowels, which is actually convenient, because a) you can remove the shelves for cleaning, and b) if an animal gets his foot caught between the shelf and the cage wall, the shelf will fall as he struggles, thus freeing him instead of trapping him.
1) Cut a 17.5 x 6 inch piece of aluminum flashing.
2) Fold 1/2 inch strip of both short edges completely under so it lies flush with the rest of the metal, like a hem.
3) Fold both a 1/2 inch strip along both long edges down so that they are at a 90 degree angle with the middle. This strip serves a triple purpose: a) gives structural integrity to the shelf, b) removes the sharp metal edge from little feet, and c) keeps the shelf from sliding off the dowels.
4) Insert two dowels through the cage walls so that they are horizontal and parallel, about 5 inches apart. The dowel closest to the nearest cage wall should not be flush with the wall - leave at least 1/2 inch of space to avoid pinching little feet.
5) To secure the dowels to the cage wall, pinch the square of hardware cloth tight around the end with pliers. You can also wrap a rubber band tightly around the protruding end of the dowel.
6) Place the shelf on the dowels.
Ramps
Ramps are easy - I build them out of strips of hardware cloth. Just cut a strip of hardware cloth to the desired length, and then fold down both edges to give it strength. Attach to the side of the cage with twists of wire.